
Chemistry
Using liquids — Safety Precautions

Laboratory Exercise
Basic Measurements
Goal: Develop basic chemistry lab skills in reading thermometers, evaluating data, and handling hot test tubes.
Equipment: (If you are substituting equipment, please see the chemistry lab list for appropriate substitutes).
- Thermometer with -10 degree Centigrade to +110 degree Centigrade range
- Beaker or heat-resistant (canning) glass jar
- Test tubes [borosilicate--Kimex, Chinex, or similar. Tubes must be made of heat-resistant glass: do not substitute anything else!]
- Test tube clamp for holding hot tubes
- Stirring rod [may use glass swizzle stick; do not use metal (reacts with acids) or plastic (melts too easily)]
- Water
- Salt
- Flame heat source (alcohol lamp or candle)
- Pipette (glass eyedropper will do)
Procedure A: Practice reading Thermometers
- Examine your thermomenter and make sure that there are no breaks in the liquid or mercury column. If the column has separated (see below), hold the thermomenter horizontally and tap it lightly against your finger until the column rejoins. If no join occurs, remember to take the separation into account when you record your scores.

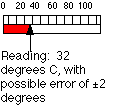 Assuming your thermometer has reached room temperature (if you've been using it, wait 15 minutes before starting this part of the lab), record the temperature. Also record the type of thermometer (alcohol, mercury, specialty type), the calibration (are marks one degree apart? 0.1 degrees apart? is it Celsius or Fahrenheit?), and estimate the accuracy to which you can read the thermometer.
- Estimate the % error as size of 100% * (error / total ). In our example, this is 100%(2/32) = 100% * .0625 = 6.25 %. Of course, we need to take significant figures into account! We have 1 digit of accuracy in th figure "2 degrees", so we wind up with a percent error of 6% in this measure.
- Fill your beaker with ice and add water until the ice is mostly covered.
- Submerge the bulb of the thermometer in the water, and try to position it so that it does not touch an ice cube or the sides of the beaker. Record the temperature at 15 second intervals until the temperature stops changing. How long did it take for the thermometer to reach equilibrium with its cold environment?
- Pour out the icewater and let both the beaker and thermometer come back to room temperature. Set the thermometer so that its bulb is not touching anything and record the temperature at 15-30 second intervals until it reaches room temperature again and stops changing. Compare this temperature with your original recording.
- Fill the beaker half full of the hottest water you can get from your tap.
- Submerge the bulb of the thermometer in the water, and record the temperature at 15 second intervals until the temperature stops changing. How long did it take for the thermometer to reach equilibrium with its hot environment?
- Pull the thermometer from the hot water. Set it so that its bulb is not touching anything and record the temperature at 15-30 second intervals until it reaches room temperature again and stops changing. Compare this temperature with your other two recordings.
Procedure B: Deciding whether data is reasonable using the Q test.
- You now have three readings for room temperature, taken under different conditions. Are all three "good" data? You need to know how to decide. One way is to subject your data to the Q test.
- Arrange data in high-to-low order. Let's assume you got the values 22.3, 22.5, and 23.1 for room temperature. The 23.1 reading is much further from the median temperature 22.5 than the 22.3 temperature: is it possibly in error?
- Determine the difference between the suspect number and its neighbor: 23.1 - 22.5 = 0.6.
- Determine the range between the high and low temperatures: 23.1 - 22.3 = .08.
- Determine Q = difference/range = (in this case) .6/.8 = .75.
- Compare the Q value with the value for 3 data points in the Q table:
3 points 0.94 4 points 0.76 5 points 0.64 6 points 0.56 7 points 0.51 8 points 0.47 9 points 0.44 10 points 0.41 - Since .75 is less than .94 (the toleration for 3 points), we keep the value 23.1 with a confidence of 90% that it is correct.
- Determine whether any of your three room temperature measurements are suspect.
- Determine whether any of the following 6 measurements are suspect and should be ignored: 203, 204, 205, 206, 207, 214.. It doesn't matter what the numbers actually mean, by the way, but in this case, they are iron parts-per-million in a soil sample.
Procedure C: Handling hot test tubes safely, and cleaning them up afterward.
- Place your test tube clamp on an empty test tube, a little below the top. Practice moving the tube around, and adjust the clamp if your tube slips. Remember that during an experiment, the tube will be full of stuff and therefore heavier than it is empty, so the clamp must hold the tube snuggly.
- Fill the test tube with 1/2 inch of salt.
- Add enough water to fill the tube to about 1 inch.
- Use your stiring rod to stir and dissolve the salt. Hold the tube at a slant, and stir so that the tip of the rod describes a slanted circle within the tube. Do not bounce the rod up and down against the bottom of the tube, or hit the sides of the tube more than you can help. Either can cause cracks in the glass which may weaken the tube when it is heated.

- Record the temperature of the water.
- Were you able to dissolve all the salt?
- Light your alcohol lamp per instructions or light your candle. [If necessary, read up on using open flames in the lab safely!]
- Be sure that your clamp holds the tube firmly.
- Hold the test tube over the flame as shown and allow the water to heat up. Move the tube back and forth continuously so that all regions of the water heat evenly (this keeps a hot spot from forming and exploding out of the tube and splattering you with hot whatever).

- Watch the tube glass! If it starts to glow or sag, get it futher away from the flame immediately [unlikely with an alcohol lamp or candle flame, but definitely possible with a Bunsen burner.]
- When the water starts to boil, remove it from the flame and record the temperature.
- Put the tube back in the flame and boil all the water away.
- Remove the tube with its crust of salt crystals from the flame and set it where it can cool, on a wooden test tube rack, or a metal rack where the bottom of the tube does not touch the metal. Metal can be cold and may cause the glass to cool too rapidly. o not use plastic--you'll melt the rack).
- When the tube has cooled to room temperature, attempt to clean it with hot water, detergent, and a bottle brush. The glass is clean when water "sheets" on it and does not bead up anywhere.
- If you want to be professional, rinse the tube thoroughly with distilled water at least twice. Then rinse it again with a small amount of acetone and set it to dry. [The acetone speeds up the drying process].
Lab Report
Describe any deviations from the procedure which you used in measuring temperature in part A. Submit your water and room temperature data and error evaluations. For part C, describe any problems you had with the procedures in heating and cleaning your test tubes.
Be sure that you answer all questions in the procedures.
© 2005 - 2024 This course is offered through Scholars Online, a non-profit organization supporting classical Christian education through online courses. Permission to copy course content (lessons and labs) for personal study is granted to students currently or formerly enrolled in the course through Scholars Online. Reproduction for any other purpose, without the express written consent of the author, is prohibited.